Vinyl siding is a versatile and attractive home improvement option. Choosing the right contractor can help ensure a smooth and efficient installation process. Look for a contractor with client references and insurance to protect you from liability risks. Contact Vinyl Siding Installation Richmond VA for professional help.
You’ll also need certain tools and materials like a hammer, utility knife, power saw, pliers, tape measure and ladder. Ensure a clear working surface by clearing the work area of any easily removable obstacles.
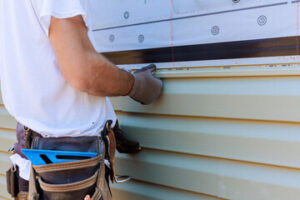
The process of installing vinyl siding requires a lot of skill and technique. To ensure the highest quality results, you need a professional installer who knows what they’re doing. The preparation needed for vinyl siding installation includes assessing wall conditions, removing existing materials, and setting up a clean working surface. This will help prevent unforeseen problems and delays down the road.
For starters, you’ll need to remove any protrusions like gutters and light fixtures from your home. Then, you’ll need to remove any trim pieces around windows and doors. This is important to maintain a clean look throughout the process and to ensure the proper seal against moisture. To make this step easier, it’s recommended to use a saw with a fine-tooth blade and to cut slowly. Also, for a smooth finish, it’s a good idea to use tin snips instead of utility knives to avoid nicking or chipping the material.
Next, you’ll need to install J-channels around any openings in your walls. This helps protect your walls from water infiltration and adds a more polished look to your exterior. To do this, measure the perimeter of each opening and cut a piece of J-channel to fit. Once the channel is in place, you can nail it down and then caulk it to create a seal that’s both functional and aesthetically pleasing.
When installing vinyl siding, it’s also important to allow for expansion and contraction. It’s a good idea to start at the bottom and work your way up, leaving an inch between each panel to allow for this. Additionally, it’s recommended to use a high-quality exterior caulking along all edges and seams for a seamless appearance and to prevent water infiltration.
In addition to these steps, you should also apply a weather-resistant barrier over the plywood sheathing to help keep moisture out. This is an important step in protecting your home and preventing water damage, and it’s typically required by code. Also, remember to apply flashing at any corners and joints between the roof and wall to prevent water infiltration. This is important, particularly in colder climates where the ground may freeze.
Installation
Before the installation process begins, it’s important to ensure the workspace is clear and organized. Wearing appropriate PPE (personal protective equipment) and ensuring that tools are in optimal working condition can help ensure efficiency and safety during this step of the project. Additionally, allowing for proper ventilation can prevent toxic fumes or dust from infiltrating the work area.
Once the work site is prepared, the siding contractors will begin with a detailed inspection of the exterior. This is a critical part of the process and will allow them to confirm the accuracy of the initial measurements. It will also serve as an opportunity to identify any potential obstacles or challenges that may affect the installation process.
After the inspection, the contractors will prepare the surface for the vinyl. This can include removing any existing siding, applying a water-resistant barrier, and installing sheathing and insulation. In addition, the installers will install a starter strip at the bottom of the wall to provide a solid starting point for the new panels.
The installers will then install the first panel of vinyl. Depending on the manufacturer, this will either be a rolled or extruded panel. Each type has its own unique design considerations. When securing vinyl, it is important to not over-tighten the nails. It is common for vinyl to expand and contract based on different weather conditions. This expansion and contraction can lead to buckling or gaps in the siding. Therefore, it is recommended that the installers leave the nail head proud of the surface to allow for float and expansion.
Next, the installers will secure any necessary undersill trim pieces. This can be soffit or j-channel, depending on the application. This will create a seal between the roof and the soffit to prevent moisture buildup.
If there are any windows or fixtures, the installers will need to account for their movement as well. For example, if a window is installed near the corner of a house, the installers will need to install a j-channel or soffit receiver at that location.
It is also important to note that any existing shutters or decorative pieces must be removed before installing the new vinyl. Otherwise, they will be nailed to the wall and could become damaged during the process.
Finishing Touches
A professional siding contractor can help with choosing the best vinyl for a home’s aesthetics, energy efficiency, and durability. In addition, he or she will ensure proper installation to prevent water damage and maintain the integrity of the structure.
The initial installation begins with a starter strip, which is placed along the bottom of the wall to provide a base for the first row of vinyl panels. The installer will then begin installing the panels, overlapping each to prevent water infiltration. Nails will be used to secure the panels, but it is important to leave a small gap at the ends of the panel to allow for expansion and contraction from changes in temperature.
Once all the panels are installed, a trim piece is put in place around windows, doors, and corners to give the house a finished look and provide a seal against moisture. Foam board insulation can also be added for additional insulation and a more energy-efficient home. Other finishing touches include caulking and sealing all edges for weatherproofing, as well as installing soffit and fascia to protect the gutter system from debris.
During the install process, it is critical to make sure the surface is clean and free of rot or debris before beginning work. It is also essential to measure accurately to ensure the correct amount of materials are purchased and that none of the siding is wasted. Additionally, it is important to communicate effectively with clients throughout the project to ensure they understand how each step works and to answer any questions they may have.
If you are planning to hire a professional siding contractor for your home improvement project, it is a good idea to ask for references and review online reviews to ensure you choose a reputable, licensed, and insured company. Peak Home Exteriors is fully licensed and insured, and all of our installers are certified by the Vinyl Siding Institute (now called Polymeric Exterior Products Association) and CertainTeed’s Advanced Training Program for vinyl, insulated, and polymer siding. Additionally, we offer a lifetime warranty on all of our installations.
Maintenance
Vinyl siding is a cost-effective home improvement option with a wide range of benefits. It insulates your home and reduces utility costs by preventing heat loss from the walls. It also prevents air infiltration and moisture damage. This material is also easier to clean and less expensive than other exterior materials. It is important to maintain your vinyl siding so it remains in top condition, maximizing its value and function.
Proper vinyl siding maintenance starts with a clean surface. To keep your vinyl siding looking like new, use a mild solution of one part bleach to four parts water or a non-abrasive cleaner that is safe for vinyl. Be sure to rinse well after cleaning to avoid any residual residue. Mold and mildew can be difficult to remove, so regular cleaning and preventive measures are key.
Once the wall is cleaned and prepped, a primer or sealant should be applied to ensure a long-lasting finish. The vinyl siding should then be installed starting at the bottom of the wall and working your way up. It is important to check the vertical alignment of each panel and apply a light upward pressure as each piece is nailed to ensure a secure hold without over-tightening. Using a level can help you achieve a straight, professional look.
The installation process for vinyl is relatively quick and easy compared to other exterior materials, making it an ideal choice for homeowners who want to improve the look of their home on a budget. It is a good idea to read and follow the manufacturer’s instructions for your specific product and tools. Always wear appropriate personal protection equipment such as gloves, safety goggles, and ear protection when working with power tools. Ventilation is also important to avoid breathing in any fumes or dust.
While vinyl is a durable and low-maintenance material, it can suffer from cracks and holes that can compromise its appearance and integrity. Taking proactive steps and regularly inspecting your vinyl siding can prevent these problems and extend the life of your investment. If you do notice any signs of moisture or structural damage, contact a qualified contractor to address the problem and prevent further issues.