Drywall, also known as plasterboard or wallboard, plays an essential role in modern construction. It is a staple in both residential and commercial building projects.
Whether a homeowner or professional contractor, mastering the process of installing drywall will allow you to transform your home or office space with ease. This comprehensive guide covers the basics of Drywall Installation Naperville from start to finish.
How to Install Drywall
Drywall is a popular and effective wall and ceiling material used in modern construction. Also known as gypsum board or wallboard, it allows builders to create walls without using mortar and plaster. Whether you’re finishing a basement, doing a remodel, or adding a room to your home, learning how to hang drywall will save you the cost of hiring a professional. This guide explains the process of hanging drywall and provides tips to help ensure a flawless finish.
Begin by preparing the area you will work in. Protect yourself from dust and debris by wearing a mask, safety goggles, and working gloves. It’s also important to clear the area of any furniture, decorations, or fixtures that might get damaged during the project.
Next, measure the space and plan how you’ll cut your drywall sheets to size. Optimal preparation will minimize drywall waste, damage to the wall later, and how often you’ll need to cut sheets. Use a tape measure and T-square to ensure accurate measurements and marks. Depending on the layout of your home, consider optimizing for full sheets of drywall wherever possible.
Once the drywall is cut to size, you’ll need to use a screw gun to drive drywall screws into each stud. This method of fastening will ensure a stronger and more secure hold than nails. Drywall screws are preferred over nails because they won’t rust and can be driven into wood more easily and quickly.
When you’re ready to hang a new sheet, rest the panel on two screws driven temporarily into each stud (if you’re working alone) about 50 inches below the ceiling. This will allow you to maneuver the drywall lift while ensuring the panel sits flat against the ceiling. For a DIY option, you can make a drywall lift from two pieces of two-by-four lumber.
Before you begin hanging the drywall, apply construction adhesive to each stud where it meets the framing members. This will prevent popped nail heads down the road and reduce the likelihood of future problems like uneven surfaces or cracks at the seams.
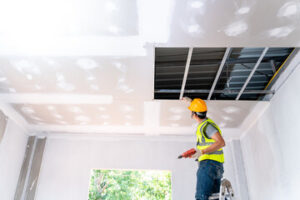
Hanging Drywall on Ceilings
Known as gypsum board, wallboard, or sheetrock, drywall is the standard material for walls and ceilings in modern home construction. Hanging drywall is an essential skill for DIY enthusiasts and professionals alike. If you’re considering taking on this project yourself, you need to understand what goes into a professional installation so you can evaluate your skill level and plan accordingly.
Accurate measurements are key to a successful drywall installation. Use a tape measure to record the dimensions of the space, and refer to this when making cuts. Then, transfer those measurements to a piece of drywall and cut it to size. Always double-check your work, as errors can be costly.
After cutting the drywall, it’s important to stagger the seams. If a single seam runs parallel to a stud or joist, you’ll have a weak point where the two pieces join. Staggering these seams distributes the load across more surface area, preventing cracking. Then, you’ll be able to patch and paint the joints with little fuss.
Before you start hanging drywall, you should check to make sure that all your fasteners are properly set. This means that they’re not too tight or too loose and that the heads are set below the surface of the drywall. You can test this by running a putty knife over the screwheads. If the head of the screw pops up, it’s too loose.
Drywall screws must be specially designed for drywall projects and should be used according to guidelines provided by the manufacturer. These guidelines typically recommend a screw length of 12 inches for framing spans of 16 inches or less and 58 inches for longer framing spans.
When you’re ready to install the first sheet, place it against the joists and ensure that one end butts up against the abutting wall and another edge fits snugly next to a door or window opening. Then drive drywall screws into each stud, ensuring that the fasteners are uniformly spaced.
When you’re finished, the last step is to sand the joint compound down to a smooth finish. This will help hide any imperfections. If you’re going to be painting, the joints will also need to be sanded down so that the primer can adhere to the surface.
Levels of Drywall Finishing
Drywall comes in a wide range of grades, thicknesses, and finishes. The level of finish your drywall contractors provide defines how well the surface will adhere to wall coverings and paint. Choosing the right drywall for your job is important to ensure it will last, especially in areas that get heavy use. Some drywall types are more durable than others, and some are even made from recycled materials.
For instance, you can purchase a gypsum board that’s labeled as eco-friendly or contains a higher percentage of post-consumer material than other types. These types are more expensive than regular drywall, but they help you reduce your carbon footprint.
Before you buy your drywall, determine the square footage of your project and how many sheets you’ll need. Multiply that number by the price per sheet to find out the total cost of your drywall. Remember to add an extra 10% to account for waste and mistakes.
When a drywall contractor offers a level one finish, it means that they’ll skip the tape and apply only a thin coat of joint compound over the seams and screw holes. This type of finish is typically used in service areas that will be covered with tile or a thick texture, and it’s also ideal for rooms where the drywall won’t be visible to the public.
During the process of level two finishing, drywall contractors will embed the tape in a thin layer of joint compound and quickly wipe it to leave a slim coating. This is then followed by another coat of joint compound on flat joints and interior angles, and finally, three additional coats of joint compound over accessories and fasteners. This is the typical drywall finishing level for walls that will be painted or covered with medium to heavy texture.
This is the highest level of drywall finishing and requires more time and skill. For this reason, a drywall contractor must be experienced and skilled to achieve this level of finish. In addition to the standard mud, a contractor may choose to use perforated or fiber tapes to produce a more uniform surface and reduce the number of layers of mud required for each seam.
Common Drywall Issues
Drywall is a ubiquitous component of modern homes and commercial buildings. It’s a versatile building material that can be shaped and adorned to create beautiful walls and ceilings. It is also used in many other construction projects, due to its cost-effectiveness, fire resistance, and ease of installation. However, like all building materials, it is not immune to problems and issues that can develop over time. Whether it’s the result of normal wear and tear, water damage, or poor selection of materials, these drywall problems can be difficult to resolve without professional help.
One of the most common drywall problems is cracking. Cracking can be caused by a variety of factors, including foundation settlement, temperature changes, and improper installation. Cracks are usually minor and can be easily repaired with a patch or joint compound. However, if the cracks are frequent or recurring, it may be an indicator of a larger issue that needs to be addressed by a professional.
Another common drywall problem is nail pops, or raised bumps where a nail or screw has been hammered into the wall. Nail pops can be a result of regular wear and tear, moving furniture around, or even mice, but they can be quite easy to repair. Simply remove the nail or screw, apply a small amount of drywall joint compound, and then sand to smooth the surface.
Finally, another common drywall issue is joint tape peeling or cracking. The tape is what holds the drywall panels together, and when it’s not in good condition, it can lead to serious problems with the integrity of your walls. This can be fixed by removing the old tape, applying the new joint tape, and then finishing it with joint compound and sanding for a smooth finish.
Having these common drywall issues can be frustrating and disheartening, but with proper knowledge and the right products, you can keep your home or business looking its best. With our high-performance joint compounds and wall putties, you can repair these common drywall issues quickly, easily, and with minimal downtime. For more information, contact a specialist today!